My Approach to Task/Time Management. Part 2: Tool set
In the previous article, I described my time/task management framework. In this part, I describe what tools I use to implement this framework. A lot of people complain that time/task management takes a lot of time, so they do not want to waste it on this useful task. Frankly, before I have been among these people. However, now it is not painful anymore because I have found the right tool set.
Table of Contents
Introduction
I used a lot of tools like Asana, Trello with Plus for Trello extension, and a lot of other task/time management applications which names I even cannot remember now. However, they were not very flexible to me because they impose their usage patterns. I have also used a custom TODO spreadsheet for task/time management for about half a year. But it lacks for a structure: all the tasks are put into one endless list. There is no incentive to maintain it because you do not have a clear agenda for each day. I see that the modern task management tools, e.g., Google Tasks, have the same issue. Once you create a task, it is displayed as just one item in a long list. Moreover, so as they are more oriented on users who use mouse, it is quite time consuming there to do different actions (you have to do many actions to do an activity). Additionally, you have only two states for tasks: TODO and DONE. Last but not least, it is impossible to do the retrospection of your day, week and month there.
For about two years, I conducted my task and time management in Evernote, which is a basic web application to take notes. I want to spend a bit more time describing this tool, because exactly there I developed my directory structure. I found this tool quite flexible for me, and in general it fitted my needs. However, it took me a lot of time to do time/task management there. Indeed, I had to copy a template, then for every day I had to type the date and the name of the day manually. Moreover, when I created a new task I had to type some additional auxiliary words (e.g., TODO). The last but not least, I had to change manually the statuses of the tasks, i.e., when a task was done, I had to wipe out the auxiliary word “TODO” and type “DONE” instead. Someone could say that I could use checklists, but a checklist has only two states as other task managers, while I want to track other statuses, e.g., that a task is not done at the planned date. Due to this limitation, I had to maintain two separate files for plan and fact, that doubled the work I had to do for my time management.
I was always astonished by the people who use Emacs with the Org Mode extension for their task/time management. Actually, I even tried to learn how to use Emacs and Org mode, but unfortunately, even though I am a Linux user for years I am a person who uses a mouse from time to time and works mostly in graphical window applications rather than terminals. I hope, one day I will start using Vim or Emacs for all my everyday tasks fully exploiting hotkey potential of these applications, but for now I am a Visual Studio Code (VSCode) user, as you may find out, thus, I will show how I use exactly this tool for my task/time management.
Software
As you may guess, the main software required for my task/time management is Visual Studio Code (VSCode). VSCode is available for all three major platforms (Linux, MacOS, and Windows), so most probably you can also use this tool. I use two VSCode extensions to facilitate my time/task management:
The first, File Utils, facilitates file management operations (e.g., copying, moving, etc). The second, Org Mode, I use for task/time management. According to the description, the developer of the Org Mode extension was inspired by the corresponding extension for Emacs, therefore, I assume that my approach can be also adopted by Emacs users.
As for some other features, I am a user of the Kubuntu operating system (OS), a Linux distribution with the KDE desktop environment. Therefore, I will describe how I use exactly this OS to facilitate my time/task management in VSCode. However, other modern operating systems have equivalent features, so you can adapt my approach to your OS.
Directory Structure
First of all, I recommend to create a separate directory where you will store all the data related to time/task management. For instance, I have a directory named Lifelogging, and this is the root directory for all my time/task management related activities. Before going further, I want to note one lifehack: if you have several computers (for instance, at home and at the office), and you want to be able to do time/task management at both places, I would recommend to add the Lifelogging directory to your Dropbox or other cloud synchronization engine. Thus, you will be able to access to your time/task management files from every place. Let’s consider the tree structure of the Lifelogging directory:
Lifelogging/
├── _docs
│   ├── blog.md
│   ├── books_to_read.md
│   ├── development_ideas.md
│   ├── habits.md
│   ├── links.md
│   ├── principles.md
│   └── sport.md
├── _template
│   ├── month.org
│   ├── week.org
│   ├── year_details.org
│   └── year.org
├── 2018
│   ├── months&year
│   │   ├── 2018:01.org
│   │   ├── ...
│   │   ├── 2018:13.org
│   │   └── 2018.org
│   └── weeks
│       ├── 2018:01:01|W01.org
│       ├── ...
│       └── 2018:13:04|W52.org
├── 2019
│   ├── months&year
│   │   ├── 2019:01.org
│   │   ├── ...
│   │   ├── 2019:13.org
│   │   └── 2019.org
│   └── weeks
│       ├── 2019:01:01|W01.org
│       ├── ...
│       └── 2019:13:04|W52.org
└── 2020
    ├── months&year
    ├── weeks
    ├── 2020:01:01|W01.org
    ├── 2020:01.org
    └── 2020.org
As you can see, in the Lifelogging directory, I have the following subdirectories:
_docs, where I store different information that I want to refer to from time to time during my task/time management activities. For instance, there I have files where I note different links, the list of the books I would like to read, the list of the habits I want to develop, etc. This is very convenient to have such information next to your plans. For instance, when you set the plan for the next month, you can always open the file with the habits list and pick several that you want to develop this month._template, where I store templates for year, month, and week files.2018,2019and2020subdirectories store the time/task management information related to a particular year. Each of this directories has the following structure:months&yeardirectory contains the files related to year and months goals. Actually, I think that it is worth to rename this directory tomonthsand store there the information related only to months putting the file with the year goals to the parent (e.g.,2020) directory. Maybe, I will do this at some point, but now this is the structure I have.weeksdirectory contains the week files.
As you can see, the directory for the year 2020 slightly differs from 2018 and 2019: there are the 2020.org, 2020:01.org and 2020:01:01|W01.org files inside it, while in other directories there are no files at all. The reason for that is very simple: I prefer to store the information about current periods in the year root directory, thus, I do not need to look for these files in the months&year and weeks subdirectories. When the period is over and the retrospection is done, I simply move these files into the corresponding directories, thus, in the end of the year I have only two subdirectories in a year directory.
Using VSCode
Let’s consider how I do my task/time management using VSCode with the two extensions that I mentioned earlier. For each of the periods (year, month, and week) I have a separate template file stored in the _template subdirectory. At the planning time, when the period starts, I copy the corresponding period template file into the year root directory and rename it accordingly. For instance, if I need to plan my month (e.g., the first month of 2020), I copy the file named month.org from the _template subdirectory into 2020 and, then, rename this copied file to 2020:01.org. I deal with year and weeks files similarly.
Before we start considering how I deal with each period in details, we need to configure the Org Mode extension. In particular, we need to set what are the task custom statuses. By default, Org Mode defines the following status keywords: “TODO”, “DONE”, “WAIT”, “SCHD”. I have a slightly different list, in particular, I have the “TODO”, “DONE”, “WAIT”, “PRTL” and “MOVE” states. You may also add the ones that suit you better (flexibility!!!). In order to do this, you need to modify the Org Mode user settings (you can read more about modifying VSCode settings here). The following screencast shows how this is done.
You have to select File -> Preferences -> Settings (or you can press Ctrl+,), drop down Extensions, find there Org Mode configuration and select it. Find Org:Todo Keywords setting. So as you cannot edit it with UI (at least, now), press the link Edit in settings.json. After this, VSCode will open the settings.json file, where you need to add (or substitute if they are already defined) the org.todoKeywords values:
  ...
  "org.todoKeywords": [
      "TODO",
      "MOVE",
      "WAIT",
      "PRTL",
      "DONE"
  ],
  ...
I have to note that my way of dealing with .org files is different from the recommended by the developers. Org Mode is developed to do only task management, while I need to have a structure corresponding to time division. Therefore, I use the features of Org Mode but do not follow its way (flexibility!!!).
Year File
In the beginning of the year, I create a new subdirectory (currently, it is 2020) in the Lifelogging directory. Then, I copy the year template file into this subdirectory. Actually, I use the File Utils extension for this. The following screencast shows how I achieve this goal:
In particular, you need to select the year.org file, press Ctrl+Shift+P to open “Command Palette” (you can also open it using View -> Command Palette… if you prefer to use mouse) and select the File: Duplicate command. Then, you just need to provide the path to the new location and new file name. I usually name the file only using current year value, for instance, currently my year file has the name 2020.org. The year file looks in the following way:
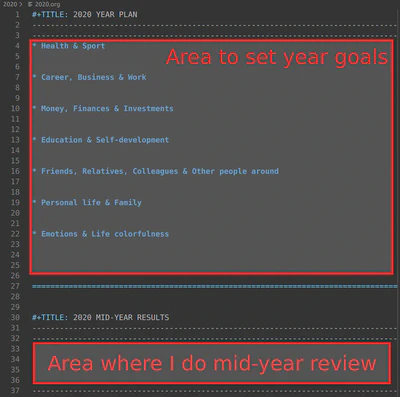
So, there I have just two sections: the first lists the goals for the year, while in the second is for the mid-year review. Usually, I do a mid-year review in the beginning of July.
Month File
Similarly to a year file, I also work with a month file. The following screencast shows this process in details. In particular, I also have a month template file that is copied in the beginning of the month to the directory of the current year. As you can see, the sequence of actions is almost the same as before.
Let’s consider in details what are the parts of the month file.
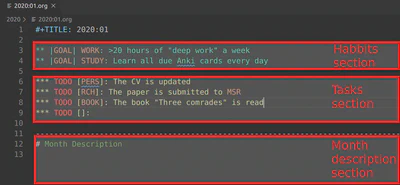
There are tree sections in my month file:
- Habits
- Tasks
- Month description
To separate visually habits from tasks, each line with a habit is started with two stars. Then, I use the word “GOAL” surrounded with sticks and specify to which area the habit belongs to. For instance, the habit “Learn all due Anki cards every day” is related to my “STUDY” activities, therefore, I prepend the habit description with this word. Once the month is over and I have to mark if the habit is held this month or not, I manually change the word “GOAL” to “DONE” or “FAIL” correspondingly. Historically, I deal with the habits this way, however, it is not the most convenient one. Instead, you can add these statuses (“GOAL”, “FAIL”, “DONE”) to your list of Org Mode TODO keywords. In this case, you would be able to change the statuses using hotkeys, specifying the area in the square brackets.
After the habits, I list the tasks that I plan to complete this month. Each line with a task is started with three stars (to be different from habits) and the “TODO” word. This is the Org Mode constraint to change the statuses of the task using the hotkeys. In the square brackets, I put the name of the project which this task belongs to. This is not compulsory, however, I found this useful because you can have the same tasks but related to different projects.
When you want to change the status of a task, put the cursor into the corresponding line and press Alt+RightArrow (the Org: Increment Context command) or Alt+LeftArrow (the Org: Decrement Context command). You can see in the screencast how I use these hotkeys to change the task statuses.
In the end of the month, I add my impressions about the month to the “Month description” section. This is a retrospection of the month in a free form. You can also easily add other sections that you need. For instance, if you may want to add metrics section where you will record metrics on the month level.
Week File
Step-by-step, we are getting closer to my core time/task management level – a week. The following screencast exemplifies how I work with the week file:
As you can see, the workflow is slightly different from the previous cases. The following figure shows the week file template.
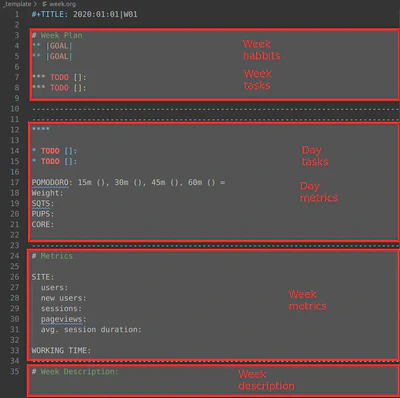
In this figure, you can see that in the upper part I have the Week Plan section with Week Habits and Week Tasks subsections, where I add the habits that I want to develop/practice and the tasks I plan to complete this week correspondingly. Then, I have the model for a Day Plan. In the bottom, I have the Epilogue section with Metrics and Week Description subsections, where I list metrics with their weekly aggregated values and describe my impressions about the week (in the previous article I considered in details how I do this).
In the week template file, I have a Day Plan model for only one day. Using Org Mode feature I generate current date and week day name and then copy this part seven times. In order to do this, put the cursor into the title line and press Ctrl+Alt+O T (or run the Org: Timestamp command from Command Palette). This command will add current date and week day name. Now, just select the updated day model and copy it 7 times (I use the Ctrl+Alt+DownArrow hotkey to do this). Then, increment (using the Org: Increment Context command or pressing the Alt+RightArrow hotkey) or decrement (the Org: Decrement Context command or pressing the Alt+LeftArrow hotkey) days so they correspond to the week. Now, you have a week template ready.
When you plan a day and you have more than two tasks, you can use the Ctrl+Alt+DownArrow hotkey to duplicate the current line. This allows me to copy a task template very fast. Thus, planning and task management does not take me a lot of time.
Here, I also should note one feature of the Org Mode extension that is not advertised by the developers extensively but can be very useful for time management. Using this extension it is possible to perform simple time tracking for a task. In order to do this, when you start working on a task put the cursor on the task line and run the Org: Clock In command (Ctrl+Alt+O Ctrl+I). This command records the start timestamp after your task. Once you have done, run the Org: Clock Out command (Ctrl+Alt+O Ctrl+O). This will record the end timestamp. Now, you can run the Org: Update Clock Total command (Ctrl+Alt+O Ctrl+U) to automatically calculate duration between start and end timestamps. Unfortunately, currently this feature cannot be used if you do your tasks in several iterations. So as usually I cannot complete a task in one shot, I do not use this functionality. However, I think it can be very useful for someone and worth mentioning here.
View
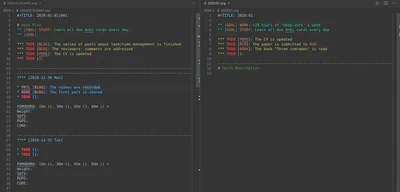
So far, I described how I deal with plan files on all levels. However, one important thing that I also want to mention here is how my VSCode workspace looks like. As I wrote in my previous article, I want to have the goals in front of my eyes all the time. Each day, I refer to my plans quite often, so naturally it is nice to see the month (as this is my main coarse-grain plan interval) goals together with the week plan. For this, I split my screen into two groups: on the left pane I have the week plan, while on the right I can see the month plan:
Concluding Remarks
So far, I described how I use VSCode and two extensions for time management. This set of tools seems to me quite flexible to cover my needs. However, I think there is still a room for improvements.
First of all, currently I have to manually copy template files, rename them and update titles. Moreover, for a week plan, I also need to copy the day model and update the timestamps. These operations take time, especially considering that I perform them quite often. Fortunately, these operations can be easily automated using an external tool, and at some point of time I plan to develop it.
Second, I need to remember the names of the projects. It would be nice to have a drop down list with all the project names when you put cursor into square brackets. To my point of view, this feature is more difficult to implement. It seems that I need to develop a custom extension for VSCode to achieve this behavior. Maybe, I will do this once :)
OS-level Facilities
So far, I described the workflow related to the usage of VSCode for the time/task management. However, I also use several facilities of my operating system (Kubuntu) as well. First, in Kubuntu it is possible to have several virtual desktops. My VSCode in time/task management workspace is constantly opened on one of these virtual desktops. Therefore, each time once the task is done I just need to switch to this virtual desktop and change quickly the status of the task. If I would need to launch VSCode in time/task management workspace each time I have a new task or a task status change, I would wast a lot of time.
However, you still need to run VSCode in the appropriate workspace every day when you power on your laptop. In order to facilitate this process, I created a simple bash script file called tm (time management) and put it so it can be found by the operating system (into the ~/bin/ directory which is added to my PATH environment variable). The content of this script is the following:
#!/bin/bash

code -n "~/Lifelogging/" # running new instance in a directory
Thus, in order to start VSCode in the time management workspace (in the ~/Lifelogging directory), I just need to run this script. I also created a shortcut in the Application Launcher, so that, I can run this script from there. Despite I have described how I run VSCode in the workspace for Kubuntu, to the best of my knowledge almost all modern popular operating systems have similar facilities, so you can easily find analogues.
One more thing that I want to mention in this article is how I track the time spent in “deep work”. On my desktop I have a timer widget. I have configured it to have four intervals: 15, 30, 45 and 60 minutes. When I plan to start working in a deep mode, I select one of these intervals and start the timer. Once the timer is over, I do a break and add a mark (|) to the corresponding interval in the POMODORO metric. In the end of the day, I count the amount of these marks for each time interval and calculate the total “deep work” time. However, if someone or something interrupts me during this “deep work”, I reset the timer and start it from scratch. Therefore, I am interested in not being interrupted at all, because otherwise the time I spend working before the interruption is just wasted.
Conclusion
In this article, I describe my tool set for time/task management. I hope that it is published just in time so that you can apply similar approach to become more organized and achieve more. In the next part, I plan to describe some lifehacks I use to stay focused and put myself into the flow state. Now, I have only one thing left: