Giscus: The New Commenting Engine for My Website
Table of Contents
Introduction
As you may know, I use Hugo static website generator with the Wowchemy template (previously known as Hugo Academic) for the website. This template enables you to plug commenting functionality choosing between several engines: Disqus and Commento. Unfortunately both of them are not a good choice for me: Disqus is heavy-weighted and supplied with lots of tracking libraries, while Commento requires you to pay (while currently I do not receive money through my blog).
So as I mostly write on technical topics, my target audience are developers, who usually have an account on GitHub. Therefore, a year ago I have decided to use the utteranc.es application that uses the GitHub issue search API to enable comments on a website. At the time, I modified the comments.html partial in order to add new utteranc.es engine and developed a partial for this specific application.
It was working great, however, recently GitHub has added Discussions feature that provides a reacher functionality than Github Issues in terms of interacting with the audience. Not surprisingly, it was quickly adopted by the project called giscus in order to create a new commenting engine. Thus, I have decided moving my website comment system to this new platform, and in this article I describe how to achieve this in your Wowchemy-based project.
Configuration
The app webpage mentions what steps should be performed in order to enable giscus comments on your website. Unfortunately, it does not explain them in details. In this section, I close this gap providing the tutorial on how to enable giscus comments on your Wowchemy-based website. If you use other Hugo template, the approach described here may not work.
Long story short, in order to enable giscus comments on your Wowchemy-based website you need to perform the following actions:
- Enable GitHub discussions for the public repository where you would store comments for your website;
- Install giscus application and allow it to access and modify data in the repository;
- Create giscus comment partial for the wowchemy template;
- Configure the parameters of the giscus template;
- Optional: convert GitHub issues to discussions.
Let’s consider every item from this list closer.
Enabling GitHub Discussions
In order to use GitHub Discussions as a comments storage on your website, you should at first allocate a GitHub repository for this: you may either create a new repository or use an existing one. So as I already have a special repository for my website comments, I will explain how to use an existing repository. However, on GitHub you can easily find instructions how to create a new repository.
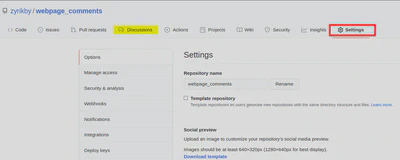
First of all, I should mention that the repository should be public, i.e., visible to all people without restrictions. After you have created a repository, go to the “Settings” tab on your repository. [Figure 1 points to where to find this tab (outlined with a red rectangular) using my repository as an example:
Alternatively, you can append the string /settings to the path in browser’s omnibox and press Enter. The URL of my repository is https://github.com/zyrikby/website_related, while the URL of the settings tab is https://github.com/zyrikby/website_related/settings
On this tab, look for the “Features” section and enable “Discussions” by ticking the corresponding checkbox. After you have done this, an additional tab called “Discussions” (highlighted with yellow in Figure 1) should appear for your repository (you may need to refresh the webpage).
Installing Giscus Application
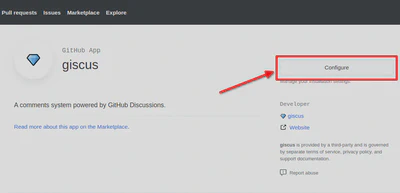
After the repository is ready, we need to install giscus application for it. In order to do this, you have to open the giscus GitHub App page and click on the “Configure” button (see Figure 2):
A screen like in Figure 3) should appear. There you should select under which account the giscus application will be installed. You must choose the one that owns the repository you have allocated for comments.
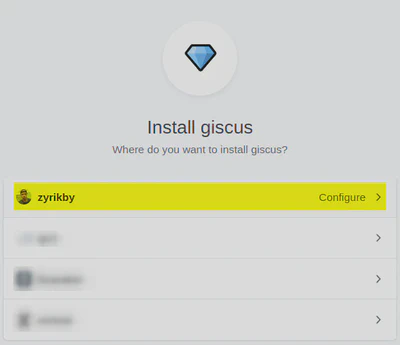
On this screen, click on the arrow > after the corresponding account. You may be asked to confirm your action by providing your GitHub password.
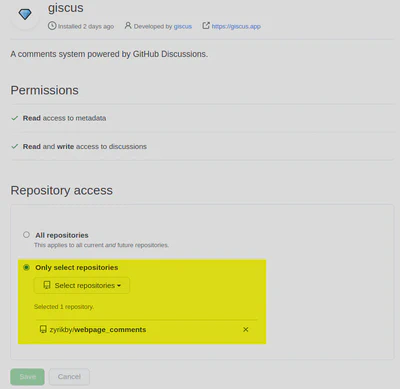
On the following screen (see Figure 4), you configure what repositories giscus app will have access to. Following the principle of least privileges, I recommend to provide an access only to the repositories it must have access to. In my case, I have given the access only to one repository that is used to store giscus discussions (see the highlighted yellow area in Figure 4).
Click on the “Save” button in order to save modifications. After this, all preparation steps are done, and we can move to the Wowchemy template modification.
Creating Giscus Partial for the Wowchemy Template
In order to enable giscus comments in the Wowchemy template, you have to make in the root directory of your Hugo website the layouts/partials/comments/ directory (if it does not exist), and create there the file giscus.html with the following content:
{{ if site.Params.comments.giscus }}
<script src="https://giscus.app/client.js"
        data-repo="{{site.Params.comments.giscus.repo}}"
        data-repo-id="{{site.Params.comments.giscus.repo_id}}"
        data-category="{{site.Params.comments.giscus.category}}"
        data-category-id="{{site.Params.comments.giscus.category_id}}"
        data-mapping="{{site.Params.comments.giscus.mapping}}"
        data-reactions-enabled="{{site.Params.comments.giscus.reactions_enabled}}"
        data-theme="{{site.Params.comments.giscus.theme}}"
        crossorigin="anonymous"
        async>
</script>
<noscript>Please enable JavaScript to view the comments powered by giscus.</noscript>
{{ end }}
The code in this file loads the giscus client.js script with a set of specified data parameters. In the following section, I will show how to configure these parameters and where to find their values.
Configuring Giscus Parameters
Now, in order to enable giscus comments, we need modify the params.toml file. We will provide there the values of the parameters. In order to find the values for these parameters, please go to giscus app webpage and provide necessary information in the “Configuration” section:
- Repository (owner/repo) - this is the part of the path after
github.com/in your repository. - Page <-> Discussions Mapping - this parameter specifies how the match between a webpage and the corresponding discussion is found.
- Discussion Category - under what category the discussions created by giscus app should be stored. It is recommended to use “Announcements” category. Note that you will see the list of discussion categories only if you have provided the correct value in the Repository textbox (in this case a green tick appears after the textbox).
- Features - here you can enable if the reactions for the main post should be displayed or not. In my case, I disable this feature because it looks weird in my template.
- Theme - you can choose what theme to use. Just change the values in the dropdown, and you will see how different styles look like.
Once, you have provided all the values, in the “Enable giscus” section you should see the code to include in your website in order to enable giscus comments. In my case, I was provided with the following snippet (I have concealed the values in the data-repo, data-repo-id and data-category-id fields):
<script src="https://giscus.app/client.js"
        data-repo="<data-repo>"
        data-repo-id="<data-repo-id>"
        data-category="Announcements"
        data-category-id="<data-category-id>"
        data-mapping="pathname"
        data-reactions-enabled="0"
        data-theme="light"
        crossorigin="anonymous"
        async>
</script>
From this snippet, we need to extract all relevant parameter values and put them into the params.toml file.
After doing this, the comments section of my params.toml file looks in the following way:
############################
## Comments
############################
[comments]
  # Comment provider:
  provider = "giscus"

  # Which page types are commentable?
  commentable = {page = true, post = true, docs = false, project = false, publication = true, talk = false}

  # Configuration of giscus
  [comments.giscus]
    repo = "<data-repo>" # Repo where the comments will live
    repo_id = "<data-repo-id>" # Repo where the comments will live
    category = "Announcements" # Repo where the comments will live
    category_id = "<data-category-id>" # Repo where the comments will live
    mapping = "pathname" # How Utterances will match comment to page
    label = "comment" # Label applied to issue by utteranc.es bot
    theme = "light" # What theme to use
    reactions_enabled = 0
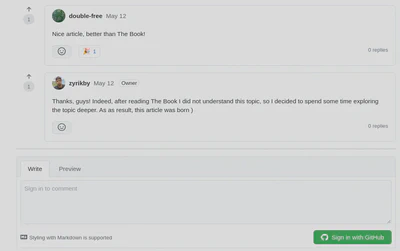
provider parameter to giscus.After this step, under each post on your website a section with a textbox to leave comment should appear. If you already have comments for a post, it may look like inin Figure 5:
Optional: Converting Existing GitHub Issues to Discussions
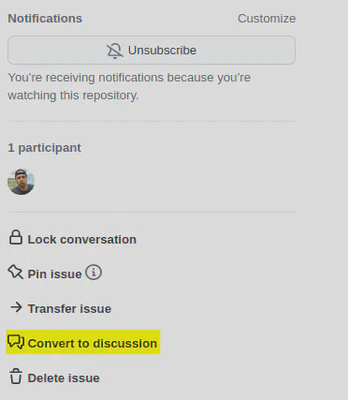
If you were using utteranc.es previously, the comments under your posts were stored in the repository issues. In order to show these comments after you have migrated to giscus, you need to convert the corresponding issues into discussions.
In order to do this, you would need to process every existing issue one by one. Open an issue, in the bottom part of the screen, among the issue actions list find the “Convert to discussion” action (see Figure 6) and click on it:
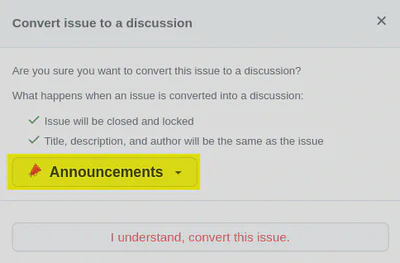
After this, a confirmation modal window will appear (see Figure 7), where you should choose under what discussion category (usually, “Announcement”) the issue should be put (highlighted yellow area). Then, click on the “I understand, convert this issue” button.
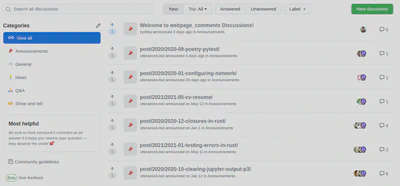
After the converting is done, you should see the list on the “Discussions” tab (see Figure 8):
After this the configuration is finished.
Conclusion
In this article, I have described how to enable giscus commenting engine for your Wowchemy-based website. If you have enjoyed reading it, please leave a comment:)