Switching Data Analytics Activities From Jupyter to Vscode
I have been using VSCode almost for all activities related to software development. The last activity I preferred to do using an external tool was data analysis. However, recently I have switched even these activities to VSCode. In this article, I share my experience and provide hints on VSCode configuration to facilitate this task.
Table of Contents
Introduction
I guess I knew about the active development of the notebook-like functionality in VSCode for a couple of years. In 2021, I even tried to test this functionality in one of my projects. However, I did not like my experience with this tool then. At the beginning of 2022, I decided to make a second try, and I like what I see this time. The pros overweight the cons, and currently, I am moving all my data analytics-related tasks to VSCode. Definitely, in one month, I have not touched all the functionality, and it may happen that in the future, I will still do some tasks in Jupyter Notebook/Lab.
The Goods
Undoubtedly, for me, the main benefit of using VSCode for working with the ipynb files is that I do not need to run a Jupyter server each time I want to see what is inside this file. That, by the way, saves plenty of my time. For instance, if I need to copy code snippets from one notebook to another, VSCode requires me to open the corresponding files and perform the operation, while Jupyter Notebook/Lab forces me to run a server (or two if files in different locations) to achieve this goal.
You probably know many useful hotkeys that facilitate your process if you have been using Jupyter Notebook/Lab for a while. For instance, one may know that the Esc+M hotkey (the Esc key switches Jupyter from the editing to the command mode) transforms a cell into a Markdown cell and Ctrl+Enter executes the current cell without moving to the next one. The nice thing is that, now, VSCode supports the same hotkeys thanks to the Jupyter Keymap extension. On top of that, you can also use VSCode hotkeys to modify content within a cell, which is very convenient. For instance, I often use hotkeys to move selected lines up (Alt+Up) or down (Alt+Down) in the cell editing mode. Unfortunately, Jupyter Notebook/Lab does not support these hotkeys.
The Explorer sidebar is more convenient in VSCode than in Jupyter Lab. I can instantly switch to the Explorer sidebar using the hotkey and quickly make file-related actions there because VSCode uses the same hotkeys for these operations in every environment.
Moreover, I like VSCode for its ability to open an output in a separate tab. For instance, if the output is very long, it is possible to open it in a separate tab. Thus, your notebook is not polluted with long output texts. Moreover, it is also possible to open generated plots in a separate tab. This could be very handy if you want to change the scale to see small details.
Some functionality is available in VSCode by default, while Jupyter Lab requires installing additional plugins to achieve the same goals. First, VSCode has a quite powerful IntelliSense support for Python. That saves some cycles if you do not remember the signature of a particular function. Second, VSCode has debug and variable explorer support out of the box. These tools are handy when you are trying to find out where an error in your data analysis is. Last but not least, in VSCode, it is much easier to analyze the differences between two Jupyter Notebook files.
The Bads
The most annoying thing I have spotted so far is that your cursor loses focus and moves to the first cell if you press Esc several times. For instance, if I want to insert an empty cell below the current one, I switch to the command mode using the Esc key and press B to insert a cell. However, sometimes pressing the Esc key does not work out, and the notebook stays in the editing mode; that results in adding B’s into the current cell. That is why, in Jupyter Notebook, I am used to pressing the Esc key several times to make sure that I am in the command mode. However, in VSCode, if you are in the command mode and press the Esc key the second time, the focus switches to the first cell and, as a result, I add a new empty cell after the first one. Interestingly, this works with the “adding a cell” operation and does not with the “deletion of a cell” operation – if you press D twice, the first line is not deleted. I do not know if this is a bug or a feature, but this behavior definitely annoys me.
The second thing, which makes hurdles for me, is that when you open an ipynb file in VSCode using your operating system explorer application, the VSCode does not detect the local virtual environment in the current directory. Usually, I create a separate directory with notebook files for each data analysis activity and use poetry dependency manager that creates a local Python virtual environment in the current directory. If you open the directory in VSCode, then this local virtual environment is detected and activated. However, if you open just one notebook, VSCode fails to detect this local virtual environment and falls back to the global environment.
Additionally, currently, VSCode does not support bokeh output. If you use this library in your activities, it may be worth to continue using Jupyter Notebook/Lab. However, I use plotly more often, so this is not a showstopper for me.
My Data Analysis Framework
Creating New Project
In the previous section, I have mentioned that I create a separate directory for every data analysis activity, where I store all related notebooks. I use poetry for dependency and virtual environment management. This tool locks the exact versions of the libraries used in the data analysis project and provides a friendly interface to manage the local virtual environment.
.venv) in the current project directory (see the in-project configuration setting).Thus, I start a data analysis project in the following way:
$ mkdir data_analysis_project
$ cd data_analysis_project
$ poetry init
# answer some questions regarding the project
After this set of commands, the data_analysis_project directory with the pyproject.toml file, where the project details are stored, is created. Now, we need to add some dependencies to our project to make VSCode being able to work with notebook files. Microsoft recommends installing the jupyter package for this. However, after some experiments, I found that it is enough to add just one package – ipykernel.
$ poetry add ipykernel
This command adds ipykernel as a dependency and installs it automatically into the current project’s virtual environment. Now, we are ready to open VSCode:
$ code .
This command launches VSCode in the current directory. During the first run, it asks if you trust the code in this directory. To execute notebooks’ cells in this directory, you have to answer “yes”. Now, you can create your notebook files in this directory. For test purposes, I have created a test.ipynb file (see Figure 1).
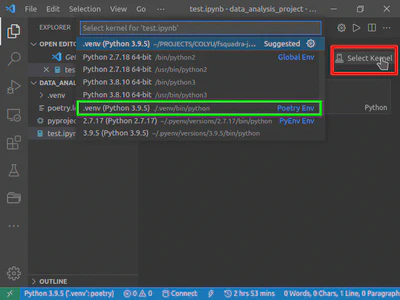
When you open the file the first time, you need to select the interpreter to run this file. To do this, in the upper right corner, click on the “Select Kernel” button (in Figure 1, it is highlighted with red rectangular) and select from the dropdown list the interpreter from the local virtual environment (.venv) – it is highlighted with a green rectangular in Figure 1. Now, you can start working in this notebook.
If you need to install additional packages, just run the poetry add <package> command within the project’s directory. For instance, to add pandas, execute the following command:
$ poetry add pandas
If you get the project from your colleague or repository and want to start working with it, you have to perform the following actions:
- Open the directory where the notebooks and
poetry.lockandpyproject.tomlfiles are stored. - Run
poetry installin the project’s directory. This command installs all dependencies from thepoetry.lockfile, thus completely replicating the initial environment. - Run VSCode from the directory, open a notebook and select the interpreter as shown before.
Note that if you use git for the version management, you need to add the .venv directory to the .gitignore file.
VSCode Configuration
I have made several changes in the default configuration of VSCode (for Jupyter and Python extensions). First, I have enabled the generation of SVG plots (see the jupyter.generateSVGPlots configuration setting). This forces VSCode to generate plots in SVG format. These plots look better than those in the default pdf or png formats. However, this format may degrade the performance, so enable this setting only if you generate plots containing few elements.
The second change requires some preliminary explanation. With the lapse of time, all data scientists develop a set of functions that they are using in almost every notebook. You have several options how to use these functions in your new project:
- All functions are copied from one notebook to another.
- All functions are bundled into a package. Then, in every new project, you install this package.
- All these functions are put into a module loaded dynamically in a new notebook.
Each approach has its pros and cons. Obviously, the first one requires some effort to copy-paste the code. However, it is possible to adjust the copied functions during this process. The second approach standardizes the process of code sharing. You can easily add this library as a dependency to every data analysis project and rely on standard Python tools for linting or IntelliSense. However, it is quite hard to change the default behavior of these functions later (you need to update the package, which may not be an option sometimes).
I rely on the third approach. I put all auxiliary functions into a Python module and load it dynamically. Thus, every my notebook starts with a cell containing the following code:
import os
import sys

common_functions_path = os.path.abspath('../common/')

if common_functions_path not in sys.path:
    sys.path.append(common_functions_path)

from ipynb_auxiliary_functions import test
Let’s consider what this code does. In the beginning, it imports two modules, namely os and sys, from the Python standard library. Then, I get the absolute path to the directory where the modules with auxiliary functions are located. If the path to this directory is not in the sys.path array, I add it there. The sys.path array contains all the paths where a Python interpreter searches for a module. Note that the order of the paths in this array matters: a Python interpreter checks all these paths sequentially and, if a function is found in a module, it stops the further search. Therefore, it matters where you put the path to the directory with the modules with auxiliary functions. As for me, I put the path to the end of the array because I assume that all my auxiliary functions have unique names. If this is not the case, you can add the path to the directory to the beginning of the array using the sys.path.insert(0, common_functions_path) call.
'' (empty string) – the path to the current directory. That forces a Python interpreter to search for particular modules in the current directory at first. Therefore, if you want to have a possibility to override the functions defined in the auxiliary modules, you have to insert the path to the first position: sys.path.insert(1, common_functions_path) (or better after the empty string '' value).Then, I import test from the ipynb_auxiliary_functions module located in the ../common/ directory. The Python interpreter loads the ipynb_auxiliary_functions module into the current address space when you execute the cell with this code. Note that if you would try to change something in the test function after this, these changes will not be loaded automatically into the address space, and Python will continue to run the old version of the test function. However, sometimes, e.g., when you develop such common functions, you would like VSCode to reload the function automatically if it has been changed.
Now, we have enough knowledge to understand the following configurations. VSCode’s Jupyter extension allows one to define a set of instructions executed automatically when an interactive window is loaded (the jupyter.runStartupCommands setting). We can use this capability to load the autoreload extension that enables the functionality described above. To achieve this goal, add the following lines to your settings.json configuration:
    "jupyter.runStartupCommands": [
        "%load_ext autoreload\n%autoreload 2"
    ],
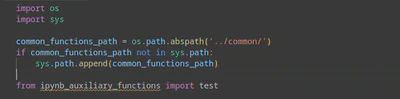
Note that Pylance (the default language server for Python in VSCode) does not recognize modules loaded dynamically (see Figure 2). Therefore, it cannot analyze our auxiliary functions and ensure IntelliSense and linting functionality.
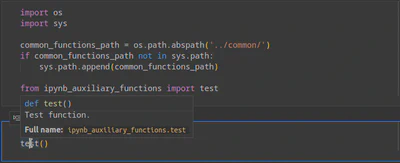
However, you can change the language server to Jedi that analyzes all the modules in sys.path. You can do this by changing the python.languageServer configuration setting. As you can see in Figure 3, Jedi can parse the data in the auxiliary modules, and thus, it provides valuable IntelliSense suggestions (e.g., docstring for the test function).
However, I should admit that according to my experience Pylance is a more powerful language server and provides better recommendations in general. Therefore, choose the language server that suits your needs better.
Conclusion
VSCode takes more and more space in my development-related activities. Data analysis was one of the last bastions that has recently given up under the pressure of this code editor.