Forward and Inverse Search in LaTeX Workshop and Okular

Although many researchers now prefer to write their papers using various SaaS solutions, such as Overleaf, I still promote an old-style way when everything is installed on your computer. Of course, this approach has some pros and cons. However, in this article, I am not going to discuss them and will concentrate instead on the topic of how to configure forward and inverse search. In particular, I will show how to do this for my setup with LaTeX Workshop, a VS Code extension facilitating text writing in TeX, and Okular, a PDF viewer available for Linux and Windows platforms.
Table of Contents
Background
However, before jumping straight to the configuration, I need to explain what is forward and inverse search and why this functionality is handy when you do write TeX documents. Unfortunately, typical TeX editors are not WYSIWIG (“what you see is what you get”); therefore, we need to compile a document to get the result. Thus, we write code in a TeX editor seeing its outcome only after compilation by opening the resulting document in a PDF viewer. Unfortunately, PDF viewers typically open the resulting paper from the start, and one needs to scroll it to see the modifications done in the code.
At the same time, it is also often required for a writer to jump back: from the PDF document point to the corresponding line in the LaTeX source file. For instance, imagine that you read the resulting PDF document and spot a typo. In such a situation, you would like to jump quickly to the corresponding line in the source document and fix the issue. Unfortunately, it may be hard to find the point of interest in the TeX sources, especially if the resulting PDF document is produced from many source .tex files.
Forward and backward search functionality is incredibly convenient if you have a multi-monitor (or large-monitor) setup. In this case, you can open the source TeX editor on one screen and the resulting document on another and jump between them. The aforementioned Overleaf platform provides inverse search functionality but, to the best of my knowledge, does not support forward search. You can see how the inverse search works by clicking twice in the compiled document window. This action should open the corresponding source file and put the cursor on the beginning of the corresponding line.
Configuration
Forward and inverse search is not new functionality - it has been available for quite some time. However, in the past, my attempts to configure it for my setup were unsuccessful, and only recently have I managed finally to do this. Therefore, in this article, I describe how to configure it for my setup:
- OS: Kubuntu
- TeX Distribution: MiKTeX
- Tex Editor: VS Code with LaTeX Workshop plugin
- PDF Viewer: Okular
Forward and inverse search functionality relies on mappings written into a .synctex file (which is usually gzipped) by the synctex utility during the compilation of a TeX document by a TeX engine. Usually, this functionality is already enabled by default in the modern TeX engines; therefore, you do not need to do anything. However, if you do not see .synctex or synctex.gz files in your TeX project root directory after the compilation of a TeX document, you will need to figure out how to activate this utility. Typically, this is done by adding a special flag (-synctex=1) to the call of the TeX compiler, e.g., pdflatex (please check in your settings that this flag is installed).
Forward Search
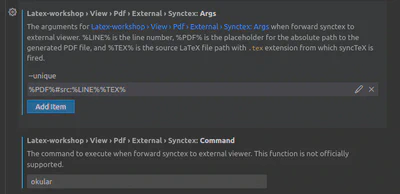
As I mentioned, for viewing the resulting PDF document, I use Okular. Therefore, we need to tell VS Code with the LaTeX Workshop plugin how to work with this viewer. In order to do this, open your user settings (open File -> Preferences -> Settings or press Ctrl+,) and find the following options:
- Set
Latex-workshop › View › Pdf › External › Synctex:Commandtookular - Add items to
Latex-workshop › View › Pdf › External › Synctex:Args:--unique%PDF%#src:%LINE%%TEX%
Figure 1 shows these options configured in my system.
These configurations can be done easier if you open the user settings in the JSON format: press Ctrl+P, choose Preferences: Open User Settings (JSON) command, and add the following strings:
...
  "latex-workshop.view.pdf.external.synctex.command": "okular",
  "latex-workshop.view.pdf.external.synctex.args": [
      "--unique",
      "%PDF%#src:%LINE%%TEX%"
  ],
...
Testing Forward Search
If everything is configured properly, you should be able to jump from your LaTeX sources to the corresponding part of the resulting PDF document. Please, open a LaTeX project in your VS Code, build it (I usually use hotkeys Ctrl+Alt+B), put the cursor to a line in your TeX sources, and press Ctrl+Alt+J (or press Ctrl+P and choose LaTeX Workshop: SyncTeX from cursor command). An Okular window should open on the corresponding part of the PDF document.
Inverse Search
We configure Inverse Search in Okular. Basically, to reach this goal, we need to call an external text editor with specific options. Please, open an Okular window, choose Settings -> Configure Okular... (or press Ctrl+Shift+,) and go to the “Editor” section. Choose “Custom Text Editor” as “Editor”, and add the following text to the “Command” input field: code -r --goto %f:%l. Figure 2 shows the corresponding configuration window.
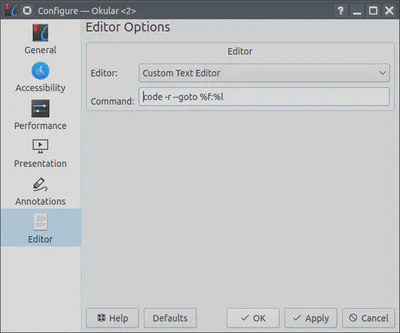
The code argument runs VS Code. The -r argument forces opening a file in the last active window; thus, a new VS Code window will not be created. Finally, the --goto %f:%l option tells VS Code to open file %f on the line %l.
Testing Inverse Search
To test the inverse search, open the compiled document in Okular. Make sure that the “Browse” tool is activated: when I put a cursor of this type over text, it looks like a hand. Then, find the point that you would like to locate in the source document, hold the Shift button and click the left mouse button. The window of the VS Code should appear with the corresponding LaTeX file opened and the cursor at the beginning of the corresponding line.
Conclusion
I hope that this article can be helpful for people who write a lot of TeX code and who prefer to work offline.